
TagWeave


.png)
1. Start with a site
Open Sites and create a site, import a project JSON or import a field pack in Tools. Tap Open the AR world for the site you want. A separate site keeps its own points, marker reference and connections. The example Water & Power / AR demonstration is fictional and deliberately small enough to explore.
2. Record the point details
In Points, add a point name, asset type, group/route, service, material, depth, diameter and notes. Choose the service colour family explicitly. Attach an optional fresh phone location, photo, blueprint, document or model. Save. Phone location is only the phone’s location. Model files stay as attachments; the app’s AR structures are built separately from points.
3. Build the connected structure
Open the AR world, then Points & structures → Add a structure between points. Choose different start/end points, shape, service/colour, dimensions and notes. A round pipe is blue for Water by default; Electrical is red, Gas yellow, Sewer green, Communications orange, Reclaimed water violet and Other light grey. Custom #RRGGBB colours are available. Choose Edit or delete structures to revise a connection. Every connected segment is saved with the project and exported in JSON/field packs.
4. Bends, branches and routes
A structure is straight between endpoint centres. Make a bend by adding a point at the bend and connecting A–B and B–C. Add a branch with another connection from B to D. For an existing route, Connect a whole route proposes adjacent connections in point-number order. Review that order before adding, then edit individual dimensions and colours. Different groups are never joined merely because two labels overlap on screen. Delete a connection to keep its two records; deleting a point removes its incident connections.
5. Explore the whole model
Drag the 3D view to orbit and pinch to zoom. Tap a sphere for point details, or a structure to edit it. Use Points & structures → Choose / edit a point when labels overlap. Display lets you filter a service, include hidden records, declutter labels, use recorded structure thickness or raise the view. Reset overview camera restores the starting view. All eligible geometry is rendered; labels are limited to the nearest 40 to reduce overlap. Missing AR positions appear in a separate grid area with amber rings. Their overview location is illustrative.
6. Present the model in the room
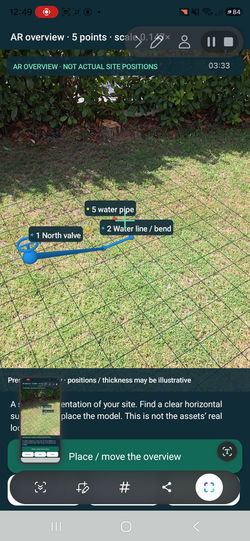
Tap AR overview, accept the AR notice and find a textured horizontal surface. Tap Place / move the overview. The complete model appears anchored to that surface at reduced scale. AR menu lets you rotate or resize it, move it, inspect records and add connections. The persistent AR OVERVIEW label distinguishes it from actual site positions. This placement is temporary and does not assign real coordinates to unpositioned points.
7. Prepare the live site reference
In Tools, share this site’s AR marker. Print the complete patterned square at 100% / actual size: 160 × 160 mm. Keep it flat, face up, fixed and uniquely associated with this site. Record its installation location and orientation externally. In Live site AR, slowly show the marker until Site reference locked appears. Do not use a normal point QR in place of the site reference. Importing an old MuseTag project preserves Apple fields but does not establish Android AR positions.
8. Place existing and new points
In the AR world menu choose Position an existing point in AR. Scan the site reference, aim the centre crosshair at a textured horizontal surface above the asset, then place and confirm. The point’s saved depth is subtracted once from the surface in the marker’s local up direction. Connected geometry follows the saved point immediately. Capture a new point in AR sends the capture to the regular record editor; enter details and Save point. For known marker-frame coordinates, Edit AR point accepts X, Y and Z and lets you choose Surface or Asset centre. Do not paste GPS values into these fields.
9. Inspect the live AR world
Live site AR shows positioned spheres, valve symbols and coloured structures in the marker frame. Tap a sphere to view its note, material, depth and attached structures; Edit AR point changes its visual details and numeric position. AR menu → Connect points starts from the selected point when possible. Choose / inspect a point also finds off-screen records and gives directional guidance. Unpositioned points remain available in the chooser and overview; place them before expecting them in real site space.
10. Keep the interpretation clear
Spheres and valve handles are symbols, not measured asset envelopes. Thin pipes may be enlarged for visibility; Display → Use recorded structure thickness switches off enlargement. Display lift is temporary and visibly labelled in AR; it does not move saved coordinates. The camera image does not occlude buried geometry: this is a drawing over the scene, not a ground-penetrating measurement. Treat all dimensions and colours as entered data, and verify alignment and site safety independently.
11. Save, share and recover
Point and structure confirmation saves locally. Use Tools → Export field pack with photos for a portable project with selected attachments. JSON includes the complete site data; CSV is a point summary. Share QR labels only with people who have the matching project. Existing site IDs cannot be silently merged during import: back up, review and replace deliberately. Keep separate versions before major edits. The app disables Android cloud backup and automatic transfer; uninstalling can remove the only local copy.
12. Help when something is missing
Use AR troubleshooting for marker, permissions, missing geometry, colour, performance and alignment issues. The full Privacy policy and Terms of use are available offline in Tools and the help reader. For support, email info@orthopractis.com with TagWeave version 1.3.0, device/Android version, the mode used, and a short reproduction. Share a minimal non-confidential sample only if needed. The Help button in live AR opens guidance without saving camera imagery.
13. Small labels, encrypted recovery and maps
TagWeave 1.2 adds actual-size 40 mm QR labels with unique numeric Code 128 barcodes, encrypted full-site PDF417 and 40 mm QR recovery sets, passphrase-based file recovery, reviewed restoration with local rollback snapshots, Google Maps directions, coloured KML connections for Google My Maps, manual GPS entry and scrollable portrait/landscape scenes. Open Tools > Labels, recovery & Google Maps for the complete steps, limits and troubleshooting. Ordinary labels are identifiers; encrypted recovery sets carry full JSON. The original AR reference remains 160 mm.
Version 1.3: launch choices, finding and hazard guidance
The app asks you to acknowledge the current terms, privacy information and field limitations on each launch or return from the background. Read the offline policies before accepting; Decline and close retains your saved records. Camera and location are separate optional permissions.
Open any point and choose Find this point · GPS, label & AR. Follow the saved-coordinate review, Google Maps confirmation, optional live distance guidance, label matching, fixed-reference alignment and independent site verification. The finding screen can save a reviewed fresh phone fix to the selected point while preserving the previous coordinate in history and retaining IDs, QR/barcode number, AR position and all connections. A GPS fix locates the phone; no GPS-to-AR conversion is implied.
Electrical and gas records display warning arrows and constant rings when visible in AR/3D. They follow service classification, not the custom colour alone. They can pulse gently; Display can switch motion off. Hidden, missing or incorrectly classified records may have no visible arrow. The scene summary counts hidden and unpositioned electrical/gas records as well. No arrows means no safety conclusion. The app does not detect voltage, gas, leaks, hidden utilities or a safe drilling path.
Read Find a point step by step in Tools for the complete workflow and two detailed examples. Read Technical appendix for coordinate frames, stable identifiers, encrypted recovery, lifecycle and limitations. Help and legal text remain available offline. Support: info@orthopractis.com. Website: https://www.orthopractis.com. Product support: https://www.orthopractis.com/geotagging. Privacy: https://www.orthopractis.com/privacy. Terms: https://www.orthopractis.com/terms-of-use.
 |  |  |  |
|---|---|---|---|
 |  |  |  |
 |  |  |  |
 |  |  |  |
TagWeave - Find a point safely
Version 1.3.0 | 12 September 2026
Support: info@orthopractis.com · https://www.orthopractis.com/geotagging
Before you start
Review the launch notice and select the three acknowledgements only if you agree and understand them. Decline closes the app and retains your records. Camera and location are optional separate choices. The notice returns after a fresh launch or when returning from the background. You can read the full Privacy Policy and Terms of Use offline before accepting.
Open a saved point, then choose Find this point · GPS, label & AR. You can also select a sphere in the AR world and use the same action. The point's full identity stays attached to its records, colours, structures and coordinate data throughout the procedure. If the site is missing, import the matching JSON/field pack or restore the complete encrypted recovery set first. A serial or unique number alone has no remote database to contact.
1. Return to the recorded area
Review the point name, site, saved latitude/longitude, source, reported accuracy and recording time. An old, manually entered or approximate fix may be unsuitable. Open saved location in Google Maps, or Directions to the recorded area, shows a confirmation before sending that coordinate to Google. It sends no site notes, recovery passphrase or AR coordinates. Maps may use its own location access and network connection. An external map is a way to approach an area, not evidence of a pipe's exact position or permission to enter it.
Choose Use my location for distance guidance if you want a current estimate. Read the location disclosure and allow approximate or precise location in Android. The screen shows distance and bearing measured clockwise from true north; it is not a phone-heading arrow or a safe walking route. Combined reported error can exceed the remaining distance. If the app says you are within the reported error area, verify the physical tag and reference; exact arrival is not established. If the source accuracy is unknown, no arrival claim is made. Guidance ends after one minute or when you leave the screen. Use Stop location guidance to end it immediately.
To attach a new coordinate, stand at the intended safe recording position and choose Save this phone fix to this point. Review the coordinates and accuracy, then confirm. The app rejects a fix older than 20 seconds at confirmation. It records phonePosition, not a surveyed buried-asset centre. The previous GPS coordinate is kept in that point's coordinate history. The point UUID, serial, QR/barcode number, AR position and connections stay unchanged. Measured coordinates can instead be entered in Edit record; mark their origin honestly and preserve the measurement report as an attachment.
2. Confirm the physical label
Read or scan the 40 x 40 mm identifier QR, numeric Code 128 barcode or an existing serial linked to the record. In Find this point, use Scan QR / barcode to confirm this point or enter the unique number. A matching result identifies the currently selected local record; a different label does not overwrite anything. The long numeric identifier preserves the complete UUID plus a check digit. Do not confuse the short record number used for route ordering with this unique label number.
Print the PDF at actual size / 100%, with no fit-to-page scaling. The QR's complete white square measures 4 x 4 cm; the surrounding card and serial barcode can be wider. Keep the white margin clear and test the printed label with the actual phone in expected lighting. A label can be copied, moved or damaged: verify its authorized physical placement and compare notes, photos and independent site references.
3. Align the AR reference
Open this point in live site AR. This uses the correct site's separate 160 mm patterned reference, printed at 100% and fixed flat at the original recorded location and orientation. Do not resize it to match the small point QR. Good light and a textured horizontal surface improve tracking. Wait for Site reference locked and independently check known control points. If the marker has moved or alignment shifts, stop, inspect the reference and use AR menu > Relock the site reference only after verifying it.
Saved Android marker coordinates and GPS are separate. A recovered GPS coordinate, Google Maps pin or point label cannot reconstruct a lost AR frame. If the reference cannot be physically re-established, use the 3D overview for record inspection and re-survey/reposition the site under an appropriate independent method. Do not silently treat old Apple marker coordinates as equivalent to Android coordinates. Points without a valid Android site position appear in the overview's separate layout area and need explicit placement for live site AR.
4. Inspect the sphere and connected structures
Tap the selected sphere for details. Choose Edit AR point for the service, colour, depth, material, visibility and position, or inspect an attached structure for its endpoints, shape, dimensions and notes. A blue pipe can link water inlet, bend, branch and valve points. Add intermediate points for every bend or change that matters; one straight connection cannot describe a curved buried path. By default thin structures may be enlarged for visibility. Display lift raises the model for inspection; neither changes the saved asset geometry. Overview placement and scale are presentation settings.
Electrical and gas records carry arrows and constant warning rings when visible in the view. They gently pulse once a second by default. Compact E! markers mean electrical and G! markers mean gas; nearby repeated arrows are reduced to keep the geometry readable, while small warning rings remain. Turn pulsing off in Display; Android animation and screen-reader settings also stop motion. Red electrical and yellow gas warnings follow the service classification even if you select a different custom colour. The summary also counts hidden or unpositioned hazard records. Arrows identify recorded hazards, not energized state, pressure, leaks or safe movement. Filters, missing positions and incomplete records can hide a warning. No symbol means no safety conclusion.
5. Save, back up and hand over
Save each changed record or structure. Export the complete field pack to keep JSON, photos and attachments together; check that it imports on a test device. For confidential portable JSON recovery, create a .twr file or all numbered encrypted PDF417/QR parts with a strong passphrase. All points and attached structures in the containing site are included, even when you start from one selected point. Keep the passphrase separately. Attachment binaries still need the field pack. Re-export after changes: paper recovery represents its export date and does not update itself.
Use Add missing to retain existing local records and deletion history; use the explicitly confirmed snapshot replacement only when you intend to replace this site's current JSON. Local rollback copies are retained before restoring over an existing site. Clear recovery history and export copies removes them separately from active site deletion. Never share private keys or recovery passwords in a support email.
Example A: buried courtyard water line
Before backfilling an authorized, independently measured installation, record the inlet, bend, tee and valve. Enter the verified material, measured depth and diameter, and attach the approved plan and photographs. Mark the route Water / blue, place its AR points relative to a durable reference, and connect the points with pipes. Keep a surface label at an authorized accessible location rather than expecting a camera to read a buried label. Record any offset between that label and the asset in the notes and plan.
On a later maintenance visit, a technician restores the current field pack, returns to the recorded area using Maps, matches the valve's printed identifier and aligns the reference. The blue connected model helps explain which recorded branch leads to the valve and opens the same notes without hunting through unrelated photographs. The technician still uses required utility locating and verification before excavation. Practical usefulness can be evaluated by comparing correct record retrieval and handover time with the existing paper workflow; this is a proposed evaluation, not a measured performance claim.
Example B: construction service coordination
Before a wall or slab is closed, document the authorized electrical conduit and gas route as separate services. Use one point at each endpoint, bend and relevant crossing. Assign Electrical / red or Gas / yellow, enter dimensions and sources, attach approved drawings and commissioning records, and create the corresponding cable/pipe connections. A cable and gas pipe remain distinct records even when close together; never use the diagram to infer a permitted separation.
During a later coordination meeting, the 3D overview can show their recorded relationship. On site, the correct reference can display the records in AR with electrical/gas warnings. The team can retrieve the actual plan and identify which responsible specialist to consult before proposed drilling. The visualization does not perform clash detection, certify isolation or authorize drilling. Evaluate the handover on a safe mock-up by deliberately scanning a different point label, confirming it is rejected, restoring the backup and comparing the complete records. Physical asset locations must be checked independently.
If something does not match
Wrong site or label: stop and select the intended record; do not replace coordinates to make an unrelated label appear correct. Missing local data: import the latest complete pack or unlock all parts of the correct recovery set. Damaged print: reprint at actual size and retain margins. No location: use an authorized measured coordinate or continue without GPS. Missing marker: inspect the overview and re-establish the frame independently. Drifting AR: improve tracking conditions, verify the marker and known controls, and stop if alignment remains unreliable. Forgotten passphrase: use another valid backup; support cannot reset it. Unknown service colour: inspect and correct the service classification rather than assuming a marking standard.
The app does not detect hidden services and is not a survey, excavation permit, emergency system or medical device. Full policies are in Help, https://www.orthopractis.com/privacy and https://www.orthopractis.com/terms-of-use. For support use info@orthopractis.com and describe your device, Android version, app version and the steps involved.
TagWeave - AR troubleshooting & guidance
Version 1.3.0 | 12 September 2026
No spheres or structures appear
Check the mode. In Live site AR, track the exact site reference and confirm the records have Android AR positions. GPS-only and imported Apple coordinates do not locate records in the Android marker frame. Open the overview to see unpositioned records, then use Place an existing point. In AR overview, detect a horizontal plane and tap Place / move the overview. Check Display for service filters and hidden records. A connection needs two positioned visible endpoints for live site AR.
Points appear, but there is no pipe
Point groups do not prove a physical connection. Add a structure with distinct endpoints or confirm Connect a route in point-number order. Select Round pipe, its service colour and diameter. Check that the connection and endpoints are visible. Coincident endpoints have zero length and cannot form a visible segment; position the points separately. Add intermediate points for bends and branches. Unpositioned endpoints only appear in the overview layout.
The site marker is not recognized
Use the patterned site AR reference PDF from the same site, not a point label. Measure the complete square: 160 mm each side. Print actual size without cropping or stretching. Lay it flat face up, light it evenly, avoid glare/blur and let the camera see the whole pattern. Move slowly closer, then slightly away. Keep the marker fixed after capture. Marker IDs differ between sites.
Tracking pauses or the geometry shifts
Stop moving quickly; improve lighting and include textured surroundings. Geometry and capture are suspended when camera/anchor tracking is invalid. If the app reports a reference change, verify the marker has not moved, then AR menu → Relock the site reference. Check known points independently after relocking. No app-only recalibration proves physical accuracy. Points far from the reference, especially beyond 8 m, may drift more; use smaller sites/control areas and independent checks.
Everything is floating or at the wrong height
Check Display → Raise the display and set it to 0 m. Check whether the point coordinate mode is Surface (subtract depth once) or Asset centre (no further depth offset). A surface capture normally records the visible horizontal surface above the asset. Review the entered depth and the marker’s installation height and orientation. Overview uses presentation scale and a display base; it is intentionally different from Live site AR.
A point is missing from the camera view
Use AR menu → Choose / inspect a point. The app guides you left/right or to turn when the selected positioned point is outside the view. Move slowly and keep situational awareness. Filters or hidden flags can exclude geometry; Display → Include hidden points and structures can reveal it. For complex scenes use the point chooser instead of searching overlapping labels. Labels are decluttered; absence of a text label does not mean the sphere was deleted.
Wrong colour or shape
Edit the point’s AR service and #RRGGBB colour, and edit the structure’s service, colour and shape separately. Structures may intentionally carry a different service from a junction sphere. Service filters retain endpoints needed by visible structures. The colour legend lists defaults and custom colours. Review against the site’s actual standard; the suggested palette is a visual aid, not certification.
AR is unavailable or the camera is denied
Install/update Google Play Services for AR on a supported device, allow Camera for TagWeave in Android Settings and reopen AR. Close another app using the camera. Some Android devices support the notebook and 3D viewer but not ARCore. Camera permission is not required for the ordinary 3D overview. Check Google’s supported-device list at https://developers.google.com/ar/devices.
The model is too small, crowded or slow
Pinch to zoom in the 3D overview. In AR overview, use Increase overview size or Decrease overview size; rotate or move it on a clear surface. Filter a service and hide labels to reduce visual clutter. Recorded-thickness mode can make small cables difficult to see from far away. Very large projects may exceed a device’s comfortable rendering capacity; divide the notebook into useful site areas and keep backups before reorganizing.
How to make the example pipe
Create points A, Bend and Valve in one route, set Water service and 90 mm diameter, and enter the material/depth. Add A → Bend and Bend → Valve as Round pipe with blue #249CFF. Add a fourth point and connect from Bend for a branch. The valve asset type adds a handle above its sphere. Assign the surface positions in live AR, or inspect them immediately in the labelled overview layout. The included demonstration site already has water and electrical examples.
Privacy, exported files and support
AR uses Google Play Services for AR as described in Privacy policy. The app does not record your camera session or send your notebook to Orthopractis. Exported files and device screenshots may contain location, geometry, notes or people; review before sharing. Deleting a point removes its attached connections; delete a connection alone to keep both endpoint records. Email info@orthopractis.com for help and avoid unnecessary confidential material.
Version 1.3: launch choices, finding and hazard guidance
The app asks you to acknowledge the current terms, privacy information and field limitations on each launch or return from the background. Read the offline policies before accepting; Decline and close retains your saved records. Camera and location are separate optional permissions.
Open any point and choose Find this point · GPS, label & AR. Follow the saved-coordinate review, Google Maps confirmation, optional live distance guidance, label matching, fixed-reference alignment and independent site verification. The finding screen can save a reviewed fresh phone fix to the selected point while preserving the previous coordinate in history and retaining IDs, QR/barcode number, AR position and all connections. A GPS fix locates the phone; no GPS-to-AR conversion is implied.
Electrical and gas records display warning arrows and constant rings when visible in AR/3D. They follow service classification, not the custom colour alone. They can pulse gently; Display can switch motion off. Hidden, missing or incorrectly classified records may have no visible arrow. The scene summary counts hidden and unpositioned electrical/gas records as well. No arrows means no safety conclusion. The app does not detect voltage, gas, leaks, hidden utilities or a safe drilling path.
Read Find a point step by step in Tools for the complete workflow and two detailed examples. Read Technical appendix for coordinate frames, stable identifiers, encrypted recovery, lifecycle and limitations. Help and legal text remain available offline. Support: info@orthopractis.com. Website: https://www.orthopractis.com. Product support: https://www.orthopractis.com/geotagging. Privacy: https://www.orthopractis.com/privacy. Terms: https://www.orthopractis.com/terms-of-use.
TagWeave 1.3.0 - Technical appendix
Build code 4 | 12 September 2026 | com.orthopractis.tagweave
Support: info@orthopractis.com | https://www.orthopractis.com/geotagging
Record topology and identifiers
A site has a UUID id, points, pointGroups and tagweaveStructures. Each point retains its full UUID, ordinal number, name, serialNumber, kind, group membership, notes, dimensions, source metadata, optional GPS coordinate and optional Android/legacy AR fields. Unknown JSON fields are preserved by project import/export and complete recovery. A selected-point action addresses both projectId and pointId; the displayed route number is not the persistent key.
The stable numeric label is the entire unsigned 128-bit UUID written in decimal, left padded to 39 digits, plus a Luhn check digit: 40 digits total. It is not a phone identifier or database password. Code 128 encodes that number. The current compact point QR is TAGWEAVE|v=2|project=<site UUID>|point=<point UUID>. Older TagWeave/MuseTag identifiers and supported embedded MuseTag codes remain recognized. External barcode fields may map to a record; ambiguous non-unique external codes are rejected. No identifier causes a first-party server lookup or downloads missing JSON.
A structure stores id, fromPointId, toPointId, name, shape, service, colour, dimensions, material, notes and visibility. Shapes include pipe, cable, duct, beam and panel/wall. Endpoint IDs form the relationship; moving an endpoint updates the rendered connection. Route proposals use ordered point numbers and need human review. Point deletion removes incident connections and records deletion history. Recovery respects recorded point and structure tombstones; old imported data may not contain complete historical deletions.
Coordinates and selected-point saving
GPS is a WGS84 latitude/longitude coordinate object with optional altitude, horizontalAccuracy, timestamp and tagweaveSource. Manual coordinates have unknown accuracy unless source data supplies it. Phone capture describes the phone's position. Finding guidance uses spherical great-circle distance with mean Earth radius 6,371,008.8 m and initial bearing clockwise from true north. This is an approximate calculation, not a surveyed measurement or a compass heading. The uncertainty display sums current and saved non-negative reported accuracy, and labels it as a non-guaranteed allowance. Unknown accuracy never establishes arrival. A near-area message requires distance within the greater of 5 m or that allowance; it still demands tag/reference verification.
Find this point subscribes to available foreground location providers after disclosure and permission, stops on leaving the screen or after 60 seconds, and rejects fixes more than 20 seconds old. Confirmation rechecks freshness. Saving reloads the latest notebook, targets the original project/point UUID pair, appends the previous coordinate to tagweaveCoordinateHistory, and replaces the current coordinate plus update time. Unchanged point fields are preserved. Coordinate history is ordinary JSON, travels in complete recovery and can include sensitive historical locations. This history is created by the finding-screen replacement workflow; existing basic editing has separate coordinate controls.
Android AR uses tagweaveLocalPosition (x,y,z metres), tagweaveReferenceId, tagweavePositionMode, tagweavePositionSource and capture time. The fixed reference is a 160 mm image tracked by ARCore's local Augmented Image workflow. Axes are +X right, +Y up from the marker face and +Z toward its bottom edge. Surface mode subtracts depthBelowSurfaceMeters once; asset mode uses the recorded centre without an additional depth subtraction. All points share a verified site reference frame. GPS, map pins and numeric codes do not resolve that frame. Legacy Apple coordinates remain in their original fields and are not silently remapped.
Rendering, warnings and usability
The shared OpenGL ES 3 renderer draws spheres, valve symbols and explicit 3D connecting geometry. A 3D overview can arrange unpositioned points in a distinct staging area with amber rings. Live site AR excludes unpositioned points. AR overview is a scaled model placed on a detected plane and is labelled as a presentation, not actual asset location. Display lift and visual thickness controls alter presentation only. Tracking drift, lost reference, moved marker and device limits can affect alignment; independently verify known control points.
WorldOverlay projects visible record positions and draws electrical/gas warning rings, arrows and labels. Electrical is identified by the electricity service; gas by gas. Existing service suggestions may infer a category from a name/group/type where an explicit valid service is absent. Custom colours do not override the warning classification. Projected points and link midpoints receive warnings where on screen; the overlay draws at most 64 small warning rings and 32 arrows per frame to limit clutter. Compact E!/G! markers use the visible legend; nearby arrows of the same service are reduced and overlapping marker labels are omitted. It can omit off-screen or clipped arrows. The textual scene summary counts all hazard-classified points and structures, including hidden and unpositioned records. Counts are records, not independent physical hazards.
Pulse frequency is 1 Hz with arrow opacity bounded between 155 and 255; rings stay opaque. The display preference, Android animator scale and touch-exploration state can disable motion. Warnings still render when ordinary point-name labels are off. They are screen overlays tied to projected scene records, not a sensor reading, danger-field simulation, automatic clash analysis or safe navigation system. Screen-reader users can inspect equivalent record service text and the scene summary through controls.
Portrait and landscape controls scroll. The 3D/camera scene sits above controls in portrait and beside them in sufficiently wide landscape windows. Native orientation handling preserves existing form views on ordinary rotation. Android may still recreate or kill activities; saved records use the notebook store and editor draft state follows the existing saved-state path. Save important changes and retain backups.
Foreground acknowledgement lifecycle
TagWeaveApp tracks started activities. When the last native activity stops outside a configuration change, it invalidates the memory-only acknowledgement generation. ConsentActivity displays a non-cancelable, scrolling notice with three unchecked acknowledgements before allowing interaction. Decline closes the task without deleting the notebook. AR and scanning resume their camera only after agreement. The app never treats a stored previous acceptance as consent for a new visit. Offline DocumentsActivity remains accessible for reading before acceptance. Internal native navigation and orientation changes do not by themselves end the foreground visit; returning from a full-screen external app can trigger a new notice. This is a local acknowledgement flow, not a remote consent ledger or an Android permission grant.
Exports and recovery format
Ordinary JSON and field-pack ZIP retain the project data; the field pack also carries supported photos and attachment binaries. CSV is a flattened summary, and KML covers located points and explicit connections whose two endpoints both have GPS. Their files are readable, not passphrase encrypted. Google Maps uses HTTPS universal URLs with api=1 and only the selected saved latitude/longitude; no app API key is needed. Google My Maps import is a separate user-directed action. TagWeave does not embed a live Google basemap, cache map tiles, use Cloud Anchors or enable the ARCore Geospatial API.
Recovery snapshot includes the complete containing site's JSON and optional focus point ID. GZIP compression precedes AES-256-GCM authenticated encryption. Key derivation is PBKDF2-HMAC-SHA256 with 600,000 iterations, a fresh 16-byte random salt and a 12-byte random nonce. The 4-byte TWR1 header, salt and nonce are authenticated as associated data. GCM has a 16-byte authentication tag. The complete file text starts TWR1: followed by unpadded URL-safe Base64 of the header, salt, nonce and encrypted bytes/tag. A passphrase is 12 to 256 Kotlin/Java UTF-16 code units, used verbatim without trimming or Unicode normalization. Keep its exact spelling, spacing and Unicode form. No passphrase is deliberately persisted or remotely recoverable.
Printed part text is TWP1|<SHA-256 of complete file text>|<one-based index>|<count>|<chunk>. A set supports up to 200 parts, with chunk length 1 to 600 characters. PDF417 uses 600-character chunks; recovery QR uses 150-character chunks to preserve readability at 40 mm. All parts must belong to the same set. Identical repeats are deduplicated; changed duplicates, missing/mixed parts and integrity failures are rejected. Maximum decompressed JSON is 32 MiB. Oversize paper output offers the complete encrypted file; no fields are silently truncated. Separate attachment binaries still require the field pack unless already embedded inside JSON. Encryption is confidentiality/integrity of that payload, not proof of the creator's identity, survey accuracy or label authenticity.
Identifier and recovery QR squares include the white margin in their 40 x 40 mm outer dimensions. Label cards and Code 128 bars are wider. Recovery PDF417 rows are printed as their own multipart format. All printable PDFs require actual-size output. The 160 mm patterned reference is separate and must never be reduced to 40 mm. The example packet's independent QR and PDF417 sets must not be mixed; each complete set restores its own encrypted snapshot.
Storage, merges and deletion
The local notebook uses AtomicFile writes. JSON imports retain unknown keys and reject duplicate site IDs rather than silently overwriting them. Recovery Add missing retains existing point/structure records and deletion history; explicit Restore snapshot replaces the containing site's current JSON after storing an app-private pre-restore snapshot. Those rollback files survive individual site deletion until the recovery cleanup action, Android data clearing or uninstall. Encrypted scan fragments persist privately until restored or cleared. Restoring decrypts into the ordinary local notebook; it does not add a separate notebook password. Cloud backup and automatic app data transfer are disabled. Exported files and prints remain under recipient control.
Verification scope and release identity
See 05_Release_and_Testing for results from this exact source/build and the real-device acceptance checklist. Emulator tests can validate application logic, saved records, printable decoding, lifecycle and 3D rendering. They cannot establish outdoor GPS performance, true physical marker alignment, utility locations, printer quality, live electrical/gas status or accuracy through soil or walls. Real AR-capable phone checks and independently measured controls are required before relying on the presentation at a site. Supplied examples are fictional, not evidence of an operational safety or time-saving trial.
Use the Play AAB for upload and the signed APK for direct device testing. The upload certificate is not necessarily the Play app-signing certificate after Play App Signing enrollment. Google assigns any account-specific developer ID and store entry; the application ID is the stable Android identifier and must remain unchanged for updates. Contact info@orthopractis.com for product support. Full policy links: https://www.orthopractis.com/privacy and https://www.orthopractis.com/terms-of-use.